With Tagboard's Fanatics integration, you can find and save merchandise from the Fanatics catalog straight from Tagboard, and then use that merch to populate an on-air graphic or add it to a landing page for a digital shopping experience. And best of all, you get paid for any sales you make!
If you're looking to promote merchandise from another source, beyond Fanatics, don't worry, you can still do that too, with a more manual workflow. Simply populate a graphic with a QR code linked to the site of your choice, and add any imagery or text you'd like to it. Our Graphics 101 article is a good place to start.
Shoppable: Search & Select Merch
First, to find the merchandise you'd like to promote, go to the Shoppable tab within the Creator Workspace of your Tagboard account. Here, you can search, filter and save merchandise from the Fanatics catalog. If you've done any social content curation through Tagboard, you'll find that this workflow is very similar. You can type keywords into the search bar or copy and past a Product ID straight from the Fanatics website.
Spark AI
Better yet, Tagboard's Spark AI can suggest merch for you. Just click the starry purple icon and let it know what kind of merch suggestions you're looking for. It will ask follow up questions to learn more about your show and audience, and then offer recommendations.

Select & Save Your Merch
Once you find merch that you'd like to save, click the little bookmark icon in the upper right corner of that item to save it. You can also create collections and save items to collections. Those will all appear in the Saved tab.
Graphics: Create a Shoppable Graphic
You'll need a Graphic with a Shoppable Element to display your merch on-air. You can create a new one or use one of our many Templates to get started. More on those in the Graphics 101 article.
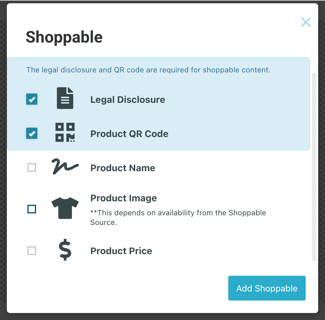
To add a Shoppable Element to a graphic, click "Advanced Elements" and then "Shoppable." This will populate a QR code and legal disclosure, both of which are required. It's up to you if you'd also like to include the product name, price and/or image. All of these elements, including the QR code, will automatically map and update for your specific piece of merch once you add that item to the graphic in Tagboard Producer.
For templates and graphics with existing Shoppable Elements, you can move and stylize them as you please.
Producer: Go Live with Your Shoppable Graphic
Once you've curated your shoppable merch and created your shoppable graphic, you can head over to Producer to go live with this content!
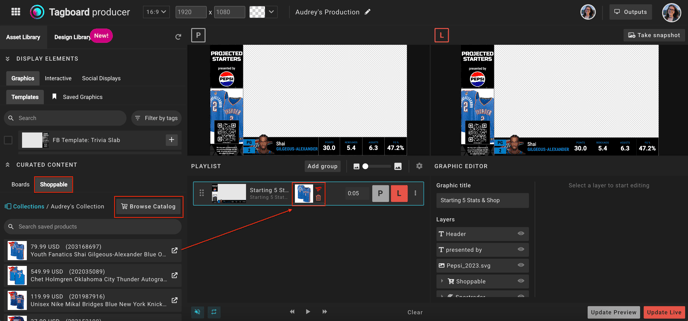
Simply, drag and drop your graphic onto your Producer Playlist and then go over to the Curated Content section of the Asset Library to find your saved items and collections. Drag and drop the item of your choosing onto the shoppable graphic. Preview your content and take it live!
You can also search and save merch straight from Producer! Click the "Browse Catalog" button, also found in the Curated Content - Shoppable tab.
Pages: A Digital Shoppable Experience
You can also add individual pieces of merchandise, and entire shoppable collections, to Tagboard Landing Pages. On the page, add a Shoppable Element and then choose if you'd like to include a single item or an entire collection. From there, style away!
👉 Get Paid 💰
Most importantly, make sure you connect your Stripe account to get paid on every sale!