
Tagboard Desktop runs your output on your computer and publishes them as NDI sources, that an NDI-capable switcher or broadcast gear can pick up. You will build and control your show in Tagboard Producer like always; Tagboard Desktop's only job is delivering the graphics to your equipment.
What you'll need
- Your Tagboard login (or Tagboard Desktop key)
- A computer running macOS, Windows, or Linux.
- A web browser already installed (Chrome, Edge or Brave. Tagboard Desktop uses it behind the scenes to draw your graphics)
- A switcher or device to receive the stream
The computer running Tagboard Desktop and the device receiving the video need to be on the same network/Wi-Fi.
This article will walk you through:
- Installing the App and Signing In
- Configuring Output Settings
- Starting your Stream
- Bringing the Stream into your Switcher
- Saving a Snapshot
- Troubleshooting
Installing the app
To install Tagboard Desktop, click on Settings from your Creator workspace, and select NDI. Choose your platform to download the app.
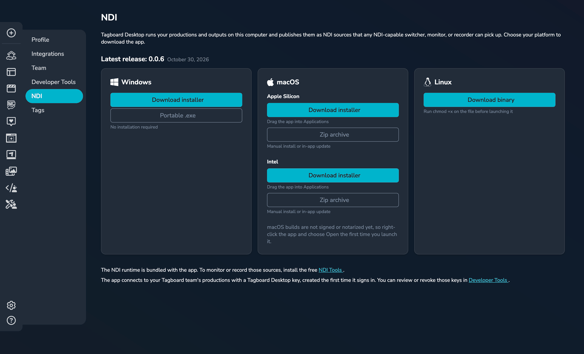
On a Mac:
- Download Tagboard Desktop.
- Drag it into your Applications Folder & open it from Applications.
On Windows:
- Run the installer.
- Open Tagboard Desktop from the Start menu.
- If Windows asks to allow network access, say yes (the app needs this to send your video).
On Linux:
Linux is supported, but setup is more hands-on and best suited to a technical team member. In short: make the provided file executable and run it, with a Chromium-based browser already installed.
Signing In
When you first open Tagboard Desktop, you'll be prompted to Sign In. Finish sign-in in your browser. If you are part of multiple Tagboard Teams, you will need to first switch to the team you want to connect to in Tagboard, then reopen the sign in link from the desktop app.
You'll know the sign in worked when you see a list of your productions inside the app.
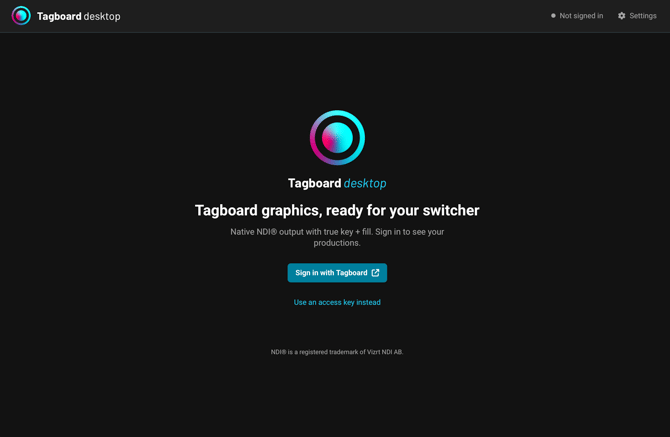
Don't have a log in? Select "use an access key instead". Your Tagboard admin will need to generate a Producer Command API key for you. Then you can paste that key in to connect.
Configuring Output Settings
Before your first show, take a quick look at your default settings by clicking on Settings in the upper right corner.
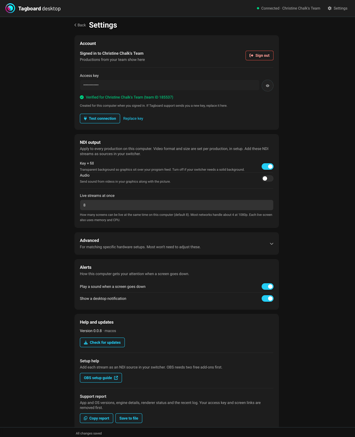
NDI Output: These settings apply to all of the streams that run from your Desktop App. (Video format and size will be set later per production)
- Key + fill (transparency): transparent background so graphics sit over your program feed; toggle this off if your switcher needs a solid background or chroma key
- Audio: option to send sound from videos in your graphics, along with the stream
Advanced: These are advanced audio settings for more specific hardware setups. Most productions won't need to adjust these.
- Gain: 1.0 is unity gain (no change)
- Audio sync (in ms): negative will play the audio earlier, positive will play the audio later
In the Settings you will also be able to set preferences for alerts if your stream goes down, check for updates, and copy a support report in case you need to troubleshoot with our Support team..
A quick note on updates: wait until you are off air to install an app update! Updating the app will prompt you to restart Tagboard Desktop, which will stop & reset your outputs.
Starting your Stream
- Before you get started, you'll need to create a Production in Tagboard Producer. Make sure that Production has a Connected Screen. (Need help creating an output? We've got you covered here.)
- In the Tagboard Desktop app, select your production from the Productions list.
- Select the video format you want for your stream. We'll default to 1080p 59.94.The size is automatically set from Producer. If you want to change the size of your stream, you can update that in Producer.
(Tip: If you need to make changes, there's a quick link to your production right at the top! Once you make the changes, come back to the Desktop App and select Refresh Screens.)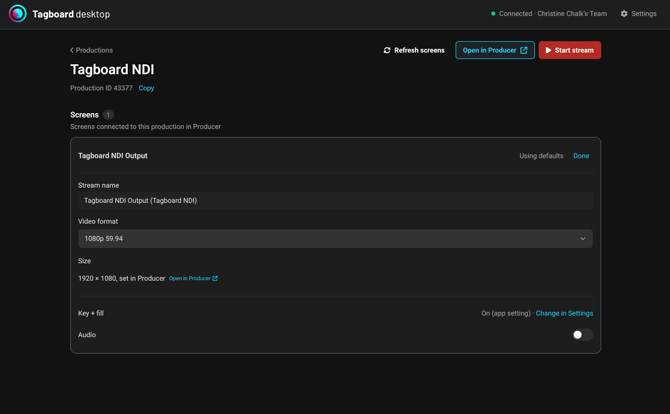
- Once you've confirmed the settings look good, select Start Stream. in the upper right corner.
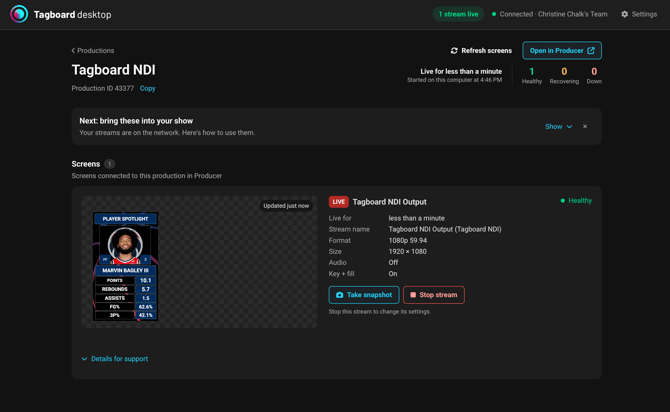
Tagboard Desktop must stay open & running while your streams are live! If you close the application, it will stop your streams and your switcher will no longer receive the feed.
Don't see the video, or it's not syncing up with Producer?
- Make sure the status actually says "Healthy," not "Starting," "Recovering," or "Down."
- Ensure the output is connected with a green status light in Producer. If not, we recommend creating a fresh Output screen in Producer.
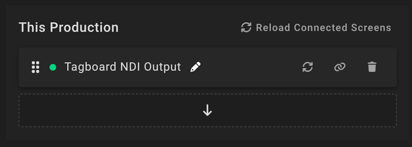
- Make sure both computers are on the same network, not a guest Wi-Fi.
- Try stopping and starting the output again.
Bringing the Stream into your Switcher
Seeing your output as "Healthy" in Tagboard Desktop means it's being sent out on your local network. The title will be: the name of your screen (the name of your production). We'll give you the exact title in the instructions in the app.
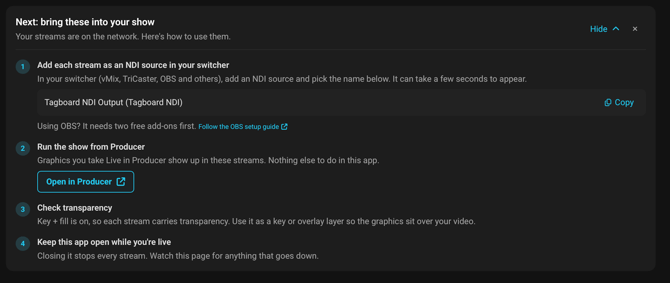
Next you need to add the stream as an NDI source in your switcher.
- If your switcher natively supports NDI: add an NDI source. Since your computer running the Desktop app and the switcher are on the same network, it should automatically discover your new stream. Select it and assign it to an input.
- If your switcher doesn't support NDI (older, SDI-only hardware): you'll need an NDI-to-SDI converter box in between. It sits on the network, picks up the NDI source, and outputs standard SDI over a cable into one of your switcher's normal inputs.
- If you're using OBS, you can follow this setup guide here.
Saving a Snapshot
Click "Take Snapshot" to save an image from your stream. This will save the most recent preview frame.
Troubleshooting
I'm connected, but my production list is empty.
- Confirm with your Tagboard administrator that the production is owned by the correct team and that the key has permission to operate it.
- Use the round refresh button on the Productions page.
My output wont' start.
Tagboard desktop renders each output with a Chromium-based browser. The NDI output and headless engines both need one.
- If your installer did not include a browser, install a supported one: Google Chrome, Microsoft Edge, Brave, or Chromium.
- Open Settings → Advanced → Helper apps → Browser for rendering graphics.
- Leave the path empty to auto-detect, or use Choose another to select the browser executable.
- Start the output again.
My output stopped right after I started it.
- Make sure the computer has enough free memory and disk space.
- Stop the output, then start it again. If Tagboard desktop was force-quit previously, a restart of the app cleans up leftover renderer processes.
The NDI source did not appear in my switcher.
You should see a source named the name of your screen (the name of your production) in your NDI receiver. If you don't, check the following in order:
- The output is Healthy.
- The receiver is looking at the right network. The sender and the receiver must be on the same local network and able to discover each other. Guest Wi-Fi, client isolation, VPNs, and separate VLANs can block NDI.
- Local firewall. Allow Tagboard desktop through the operating system firewall. On Windows, allow the prompt the first time the app runs; the installer also adds an NDI firewall rule.
- Stop and start the output. This recreates the NDI sender.
I see the NDI source, but my output is black, transparent, or has no background.
- Check Settings → NDI output → Key + fill. Turn it off for an opaque feed; turn it on when you need transparency for keying. If you change the setting once your stream is already live, you'll need to stop & restart your stream. The setting change only applies to new outputs.
- If a transparent output appears black in a receiver that does not support alpha, that is expected. Use a key + fill workflow or an opaque output instead.
I see the NDI source, but my graphics are the wrong size or shape.
- Open the production setup page and check Size on the output card. It controls the page canvas and the captured frame size. The size can be updated in Producer.
- Check Video format for the NDI frame rate and scan type.
- Stop the output before changing either setting. The live monitor does not edit settings while an output is running.
My output is slow or choppy.
- Open up the Details for Support (found right below your live stream details). This will show the content frame rate. Note that a static page can show a low number while NDI still sends a steady signal.
- Check CPU and memory on the computer running Tagboard desktop.
- If the output contains video, make sure the source video is playing smoothly in a normal browser first.
There's no audio from my NDI source.
Tagboard desktop captures audio from the output page and sends it as part of the NDI source. It does not capture the computer's system audio. Check:
- Settings → NDI output → Audio is on, and Audio is on for your current stream. If you change the setting once your stream is already live, you'll need to stop & restart your stream. The setting change only applies to new outputs.
- Settings → Advanced → Gain is not zero and Audio sync in ms is not set to an extreme value.
- The source media is actually playing with sound in a normal browser.
- The NDI receiver is using the audio track from the Tagboard source, not a different source.
Audio from some embedded players, such as YouTube or Facebook iframes, may not be available to the capture. DRM-protected media may also block capture.
I can't save an image. The option is disabled.
- Save image is enabled when your screen has a preview frame. The preview refreshes automatically every two seconds.
- Wait for Healthy, then try again.
- WebLinked and system browser outputs do not have a preview. Monitor the NDI source in your receiver instead.
- If the preview stops updating, make sure the output is still Healthy. A stopped or down renderer has no frame to save.
These questions didn't solve my issue. I still need more help!
- Open Settings → Help and updates → Support report
- Copy report or Save to file. (This report will automatically remove your access keys and output links.)
- Send the support report to support@tagboard.com, along with:
- A description of what is happening and any error messages you received
- The production title and Production ID (you can copy this from right inside the app)
- The Details for Support (you can copy this from right below the preview screen