.png?width=300&height=50&name=kb-logo-alt%20(1).png)
The Tagboard Producer plugin turns your Stream Deck into a physical remote for your Producer playlist: press a button, take a graphic live, no browser required.
There are 4 steps to initially get set up:
- Create an API key in Tagboard: this is what lets Stream Deck talk to your Tagboard account
- Connect that key to the plugin in the Stream Deck app: this links the two systems together
- Assign your Stream Deck to a specific production in Tagboard: this tells the device which show it's controlling
- Build your button layout: drag actions onto your Stream Deck buttons, such as playlist navigation, take live and clear live
Before You Start, you'll need:
- The Stream Deck desktop application installed and running
- An Elgato Stream Deck
- Your Tagboard login and access to the production you want to control
Tip: If you're setting up for a live production, we recommend doing this in advance. Button assignments can take a few minutes to get right the first time, but the good news is you'll only need to do it once!
Step 1: Create a Stream Deck key in Tagboard
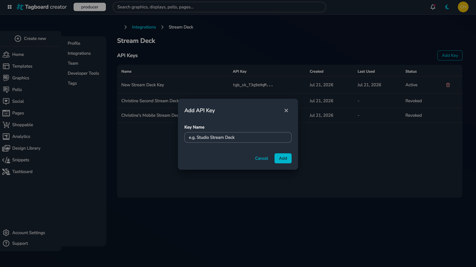
- Go to Account Settings and select Integrations.
- You'll see Stream Deck in the Controllers section. Click 'Manage'.
- Select 'Add Key' and name your key. You can connect multiple keys, so we recommend using a name to differentiate between your devices. (You won't be able to update this name later.)
- Copy your key and save it in a secure spot. You won't be able to see this key again! (Don't worry if you lose it, you can always generate another key and reconnect)
Step 2: Connect the API key to your Stream Deck
- Open the Stream Deck application
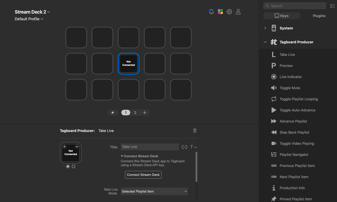
- Search for Tagboard Producer and install it the Plugin. (You may need to restart the Stream Deck application if prompted.)
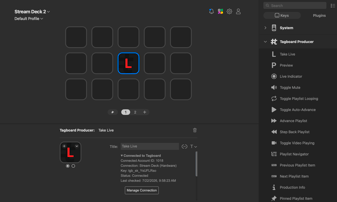
- Drag any Tagboard Producer action onto a button.
- If this is your first time using the Tagboard Producer plugin, you'll be prompted to connect your Stream Deck app to Tagboard using your key. Paste in your API key and hit connect.
Step 3: Assign your Stream Deck to a production
Each physical Stream Deck needs to be told which Tagboard Production it controls. Each device keeps its own assignment, selection, and controls completely separate. Actions on one device never affect another.
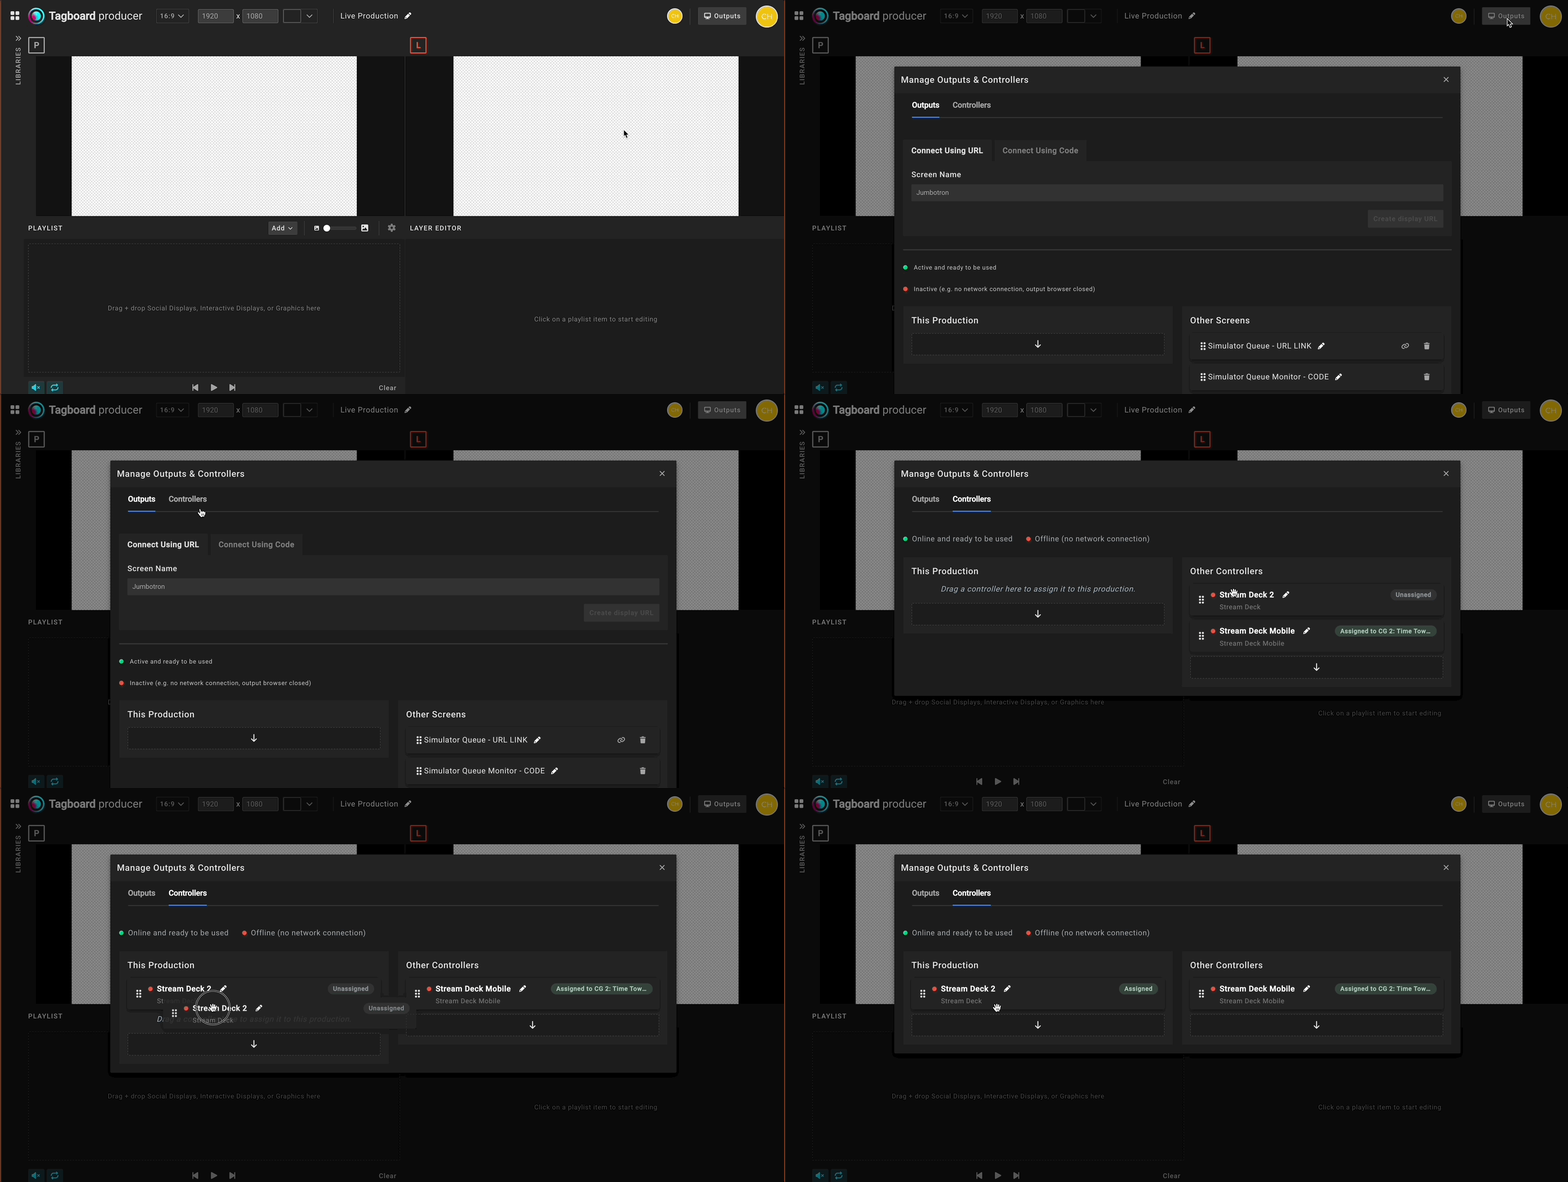
- Inside the Tagboard Production you want to control, open the "Outputs" modal.
- Select Controllers. Here you'll see your connected Stream Deck devices.
- Drag and drop the Stream Deck onto this production.
Step 4: Build Your Button Layout
Now that you're connected, add the actions you'll actually use during a show. Here's a quick reference guide for the most common actions:
|
I want to... |
Use this action |
|---|---|
|
Navigate to a specific graphic to prep to take it live |
Playlist Navigator / Next Playlist Item / Previous Playlist Item |
|
Check a graphic before it airs |
Preview |
|
Send the selected graphic live |
Take Live |
|
Swap the live graphic for another one |
Select new item in playlist navigator, press Take Live |
|
Clear the live output |
Live Indicator / Clear Live |
|
Instantly recall a favorite graphic |
Pinned Playlist Item |
|
Move to the next graphic on my rundown and take it live |
Advance Playlist |
|
Toggle video to play or pause |
Toggle Video Playing |
|
Mute/unmute audio |
Toggle Mute |
|
Check which show this deck controls |
Production Info |
Drag each action from the sidebar onto a button, then configure its settings. Some actions have customizable options (play video, hold to clear, etc.).
Not sure where to start? Use one of Tagboard's Default Profiles, and tweak from there! (These packs were customized by real-life producers who've used the Tagboard Producer plugin to run live shows!)
How the Core Actions Work
Take Live
This is your main "go" button. A short press will take an item live, based on your Take Live Mode:
-
Selected playlist item (default): takes whatever playlist item is currently selected by your Playlist Navigator. This allows you to cue up a specific graphic to fly live.
-
First playlist item: takes the first item in your playlist live. This is handy for a simple "top-of-show" button that doesn't depend on any navigation state.
By default, a short press of the Go Live button will only toggle graphics live. It will not toggle graphics off. This is intentional: during a live show you don't want your main action to accidentally cut your output because someone bumped the button twice!
Additional options:
- Hold to clear: long press (half second) the live button to clear live
-
Play video: when this is toggled on, it will automatically start video playback when you take an element with video live
Playlist Navigation
These actions do not take anything live or change what's in preview. It just points to what you want to act on next, if you are using the Take Live button in "Selected Playlist Item" mode.
-
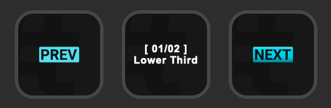
Playlist Navigator: shows what playlist element is currently selected (name of the item + what number it is on the playlist); you'll see a red indicator next to the item that is currently live
-
Previous playlist item: moves your navigator to the previous element on your playlist
-
Next playlist item: moves your navigator to the next element on your playlist
Tip: you can press the playlist navigator button to step through your playlist, in addition to using the next button. This is a great option if you're working on a Stream Deck Mini or have fewer buttons reserved for Tagboard on your device.
If the selected item is an element with social posts, the navigator will show you how many social posts there are. A long press on the next button lets you drill into the exact post you want.
The first selection will show "Template". This will take your social graphic live with no post selected. Each additional press will advance through each individual post. A second long press will step back to the parent graphic element.
Live Indicator / Clear Live
This button has two core jobs: it tells you at a glance if anything is live, and it's your dedicated way to clear the output.
-
Red: you currently have a live element; pressing it will clear the live output
-
Grey: nothing is live; pressing it does nothing (there's nothing to clear!)
Why is it separate from the Take Live button? Clearing your output is a disruptive, on-air action. Keeping it on its own button (or behind an explicit hold) means it never happens by accident as a side effect of taking a graphic live.
We recommend you always include "Live" and "Clear Live / Live Indicator" buttons, and put them somewhere deliberate on your Stream Deck. Some teams put Clear Live in the corner of the deck, so it's reachable but not next to the Take Live where a stray tap could hit it.
Pinned Playlist Items
Pins let you skip navigation entirely for graphics you use repeatedly. It's a hot key assigned to one playlist element, so one click takes it live.
To assign a pin:
-
Add a "pinned playlist item" action to your Stream Deck.
-
Use your playlist navigation buttons to navigate to the graphic you want to pin.
-
Press and hold the "pinned playlist item" button for half a second. That item is now saved to that button.
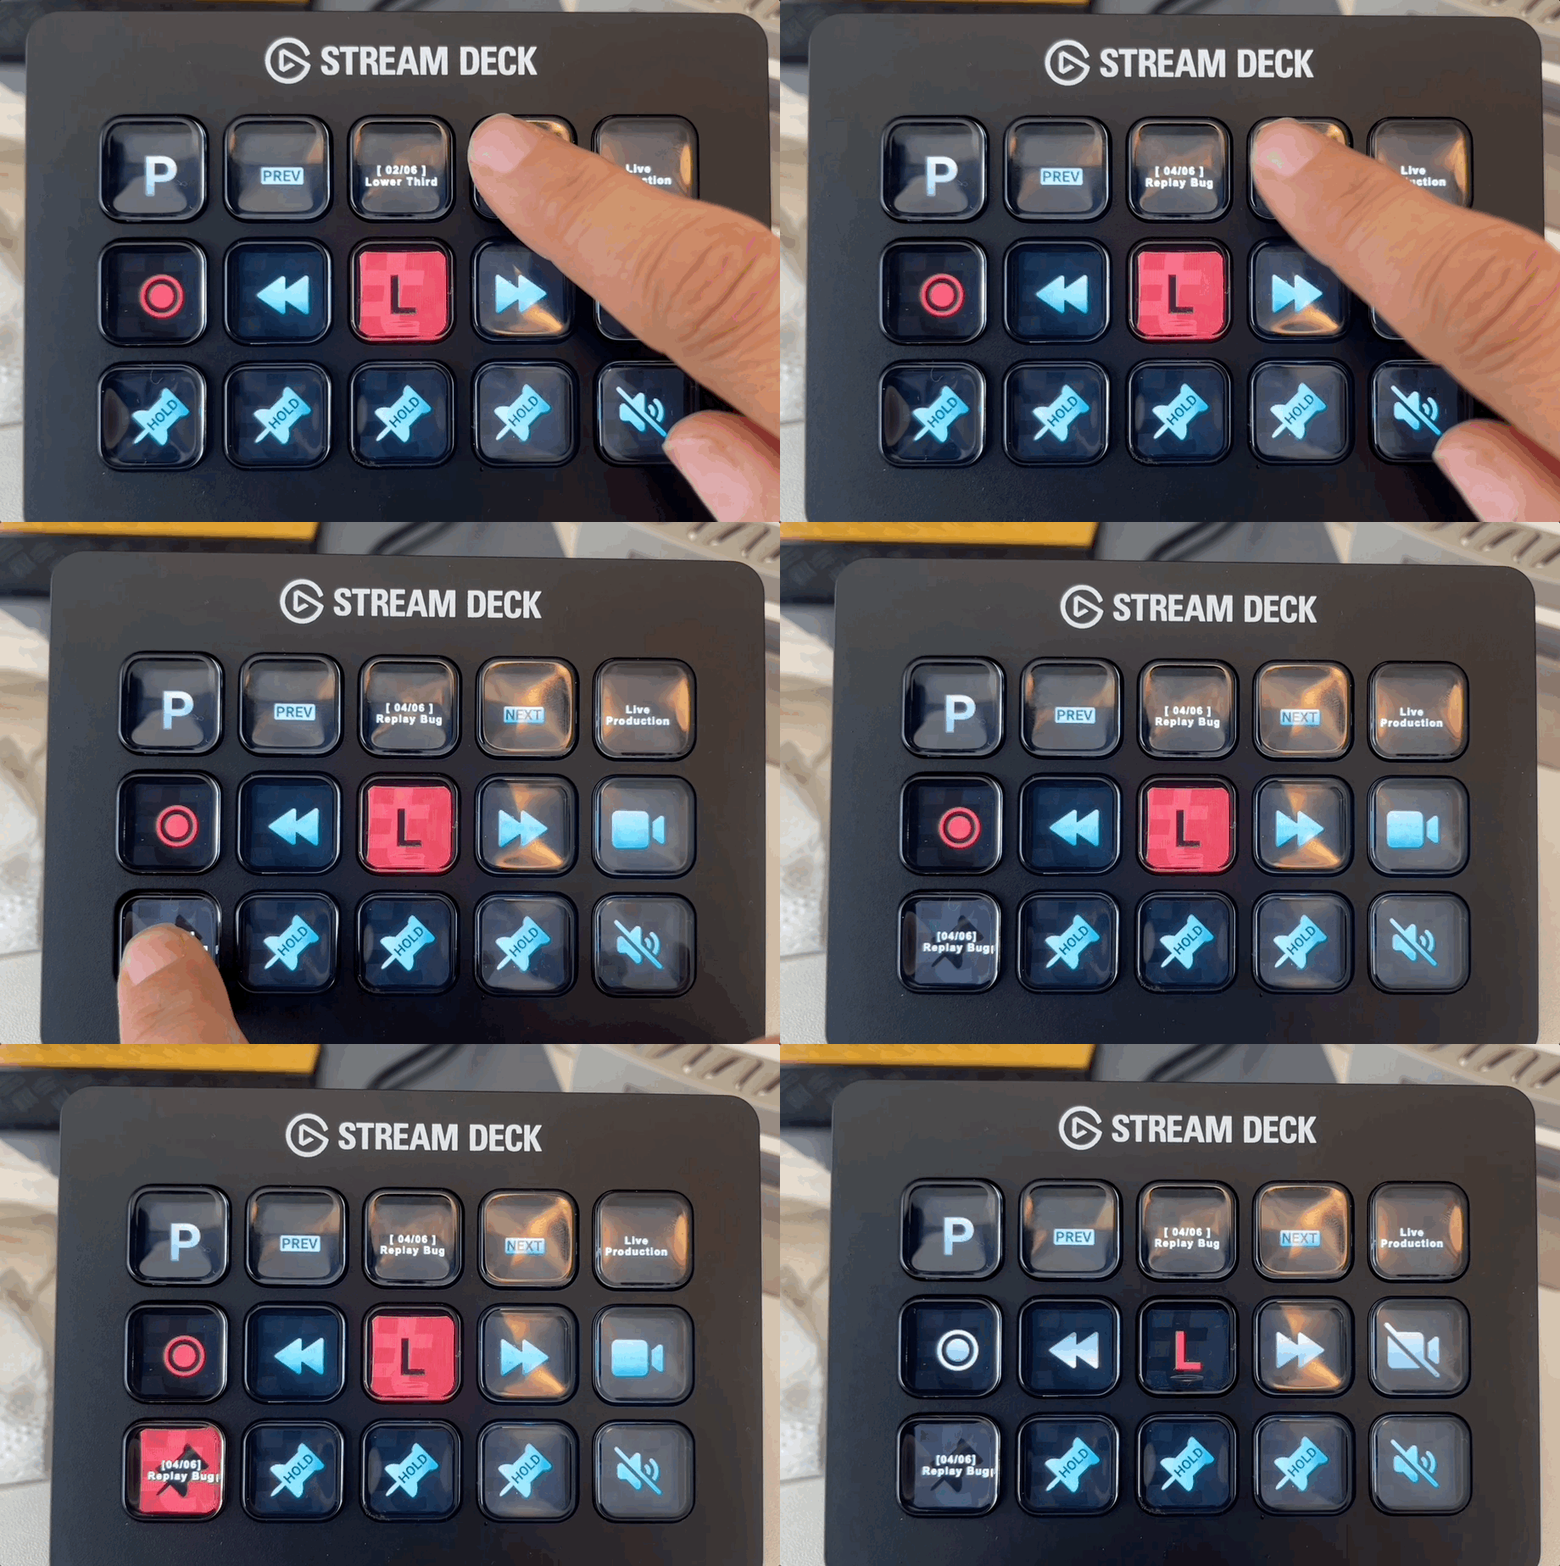
"My pinned button says missing": Either the graphic was removed from the playlist, or the device is now assigned to a different production than the one the pin was created in. Navigate to a valid item and hold the button to re-pin it
Advance Playlist / Step Back Playlist
This will move a live rundown forward or back, to take the next or previous element live.
These buttons behave exactly like the advance/step back buttons in Tagboard Producer. They are only available once the playlist is live.
Preview
Load a graphic into preview without putting it on air. Useful for double-checking spelling, images, or template data before it goes live.
-
Short press: preview the current selection
-
Long press (1.5 seconds): clear preview
Rundown Controls
Toggle Video Playing: plays/pauses embedded video; only available when an element with a video is live
Toggle Auto-Advance: puts your playlist in "play" mode, automatically moving to the next rundown item; in order to toggle auto-advance on, you need to take an initial item live so it knows where to start. The button will be disabled until an item is live.
Toggle Playlist Looping: loops the rundown back to the start when it finishes; great when used in tandem with auto-advance
Toggle Mute: mutes/unmutes the playlist's audio; the button always reflects the current state so you always know if you're muted at a glance
Production info: a read-only button showing which production your stream deck is currently assigned to (if the display ever doesn't match what you know is happening on air, you can hold down this button to re-sync to force a refresh)
Tips for a Smooth Show
Tip for a smooth show: Set up your playlist in Tagboard Producer in advance!
Using Sportradar? Pre-select the player inside your Graphic Editor. Running a poll? Select the results state in Producer. This will make the handoff to Stream Deck seamless, so the graphic is ready to go live in the state you want it.