
Spark Resize creates a resized copy of your Tagboard graphic, optimized for a new canvas size. It rearranges supported content, adjusts spacing and adapts the layout while keeping your graphic editable.
Resizing a layout takes design judgment, and Spark Resize is built to get you most of the way there. But we always recommend every resized copy gets a quick check for any needed adjustments before you go live. Skip ahead for tips on how to prepare your graphic to get the best results.
Using Spark Resize
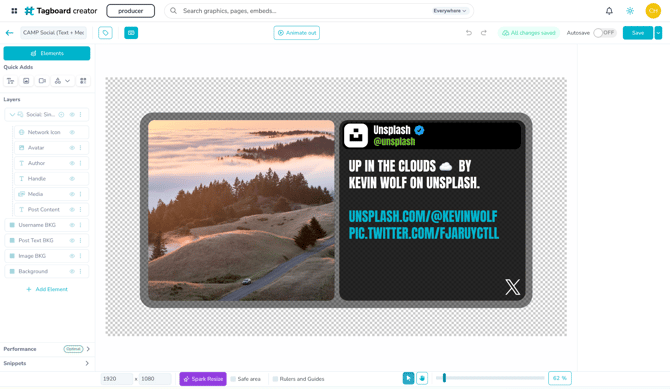
- Open the Custom Graphic you want to resize and click the Spark Resize button at the bottom of your canvas.
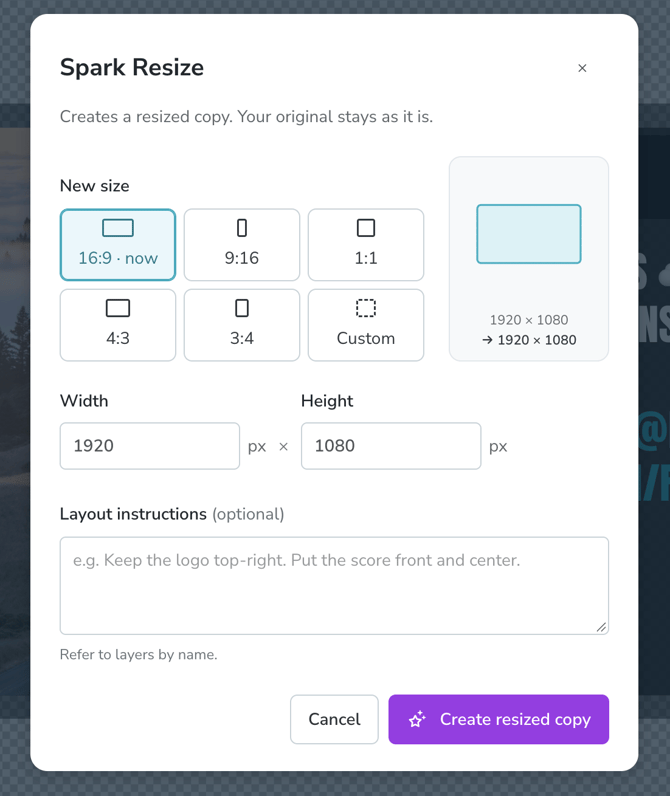
- Select your new canvas size (or type in a custom width & height) and add optional layout instructions. When you’re ready click Create resided copy. (If you have unsaved edits in your original, we’ll save those edits to the original first so the copy includes them.)
- You can track progress in the modal. Don’t want to wait? No need! Just close the modal and come back when you’re ready.
- Open the resized copy and review it. Your original Custom Graphic will remain untouched.
- Make any final adjustments in the editor before going live!
We recommend checking these areas in particular:
- Text: Is it readable, fully visible and comfortably spaced?
- Composition: Are important elements prominent? Does empty space serve the design?
- Images and backgrounds: Are crops appropriate, with important faces, logos and artwork visible?
- Related content: Are names, numbers, photos and labels still clearly associated?
A few notes:
-
All layers in your graphic will be used in the resized copy.
-
Spark Resize will not freely rewrite copy, remove inconvenient elements, replace assets, invent imagery, or substitute fonts to make things fit.
- A landscape background may be enlarged proportionally to cover a portrait canvas. That can remove empty gaps without stretching the image, but it may also crop parts of the original artwork. You may need to adjust the background or use an asset prepared for the new aspect ratio.
Share feedback
Give a thumbs-up or thumbs-down in the resized copy’s result notice, to tell us how the resize worked for you. You can always change your rating. Your feedback helps us understand where the experience needs improvement.
How it chooses a layout
Spark Resize considers the new dimensions, the original arrangement and the relationships between elements. Groups, layer names and any layout instructions you provide can help it decide which pieces belong together and what should stay prominent.
It may stack content, rearrange a set of cards or keep a design together and resize it proportionally. There is no single layout that works for every graphic. A full-screen stats graphic and a lower-third overlay have different purposes, even when they use the same canvas size.
Prepare your graphic
Group layers that belong together
Use logical groups for related content, such as a player's photo, name and statistics, or a label with its supporting shape. This makes those relationships clearer.
Avoid putting the entire graphic into one large group just for resizing. Large or complex groups can limit how freely their contents can be rearranged. Grouping helps describe your design, but does not guarantee a particular result.
Give layers useful names
Names such as “Main headline,” “Sponsor logo,” “Player photo” and “Score panel” provide more context than “Image 12” or “Group 4.” Names are helpful clues, not commands, and they do not change what an element can do.
Keep important content separate & editable
Text and logos embedded in a background image cannot be moved independently. When practical, keep important text, logos and photos as separate editable elements.
Background images may be cropped to fit a new shape. If an important logo or message sits near the edge of a background image, check that it remains visible in the resized copy.
Make repeated content consistent
Similar card structures and clear associations help the system recognize a collection.
Start with a clean original graphic
Check the original for clipped text, very small labels and crowded spacing. Resizing is not a reliable way to fix problems already present in the source.
Add instructions when the intent matters
Layout instructions are optional, but can be very beneficial to get your desired result. You can start with the new size alone, then add guidance when you have a specific priority.
Useful examples:
- “Make this a full-screen portrait graphic. Keep the headline prominent and the player cards together.”
- “Keep this as a lower third near the bottom. Leave the area above it open for video.”
- “Place the post text above the photo and keep the author information nearby.”
- “Keep the sponsor logo in the bottom-right corner.”
Keep instructions short and focused on the result you want. Refer to layers by name when useful. Instructions guide the layout, but cannot override protections for content, media proportions or functional elements.