Classic Interactive - Custom Poll
This article serves as a detailed walkthrough of the Custom Poll creation process.
Getting Started
To get started, you will want to access Custom Polls within your Tagboard account by:
- Navigating to "Interactive" [which automatically places you into "Polls"]
- Followed by selecting "Create New" then "From Scratch"
- Then choose "Custom Poll" and "Create"

Now that you are in the Poll Builder, follow the 5 sections on the left sidebar from top to bottom. Each section is covered in detail below.
Title
Start by titling your Interactive Poll in the upper left corner of the builder [via the "Title" menu]. Then you can begin to customize your first-party poll.
Poll Data
The "Poll Data" menu is where you will add a poll question ['prompt'], 'options', 'start and end date', and more. This section will walk through how to utilize all items within this menu. Click "Poll Data" and read along below.
Start by selecting a poll type [single vote or trivia] followed by a prompt. The prompt is the poll question your users will see.
Add up to 50 poll options [or multiple choice answers... you need at least 2]. You will have the ability to stylize each option individually, including the color of the bar, the font color, and can upload a custom avatar [image or GIF file].

Next, set the start and end date of your poll. Polls can run for a maximum of 30 days. If a poll is embedded in a digital experience but the start date is still in the future, users will not be able to cast votes.

By default, the poll status and percentages after voting will be toggled on.
- Poll status refers to the line below all the options. Whether the poll is open/closed, how many days are remaining, and the total number of votes. Toggling this off will remove the entire line.
- Percentages after voting toggled on means that when someone votes they will see the percent vote towards the options. When toggling this off, the voter will see the option they voted for.

You have total control to customize the post-vote message. This is the message that users will see after they have voted in your poll. This could include a call to action to tune into your livestream or broadcast to see the final poll results! If you are using the Interactive Poll to run a trivia campaign, you could include the correct answer to the question in the post-vote message.
There are two options for how to use your post-vote message:
- Message
- The message type will display the 50 character maximum text right below the voting options after a viewer has voted.

- The message type will display the 50 character maximum text right below the voting options after a viewer has voted.
- Pop-up
- Using pop-up gives you the option to place a title, sponsor logo, and a clickable button within a pop-up. Thus leading your voter to any URL of choice.

- Using pop-up gives you the option to place a title, sponsor logo, and a clickable button within a pop-up. Thus leading your voter to any URL of choice.
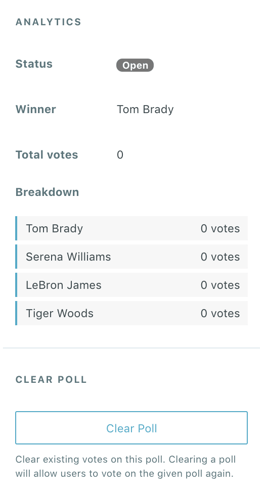
The analytics will constantly update throughout the duration of your poll, so you can return to this Smart Panel builder at any time to get updated data. Tagboard will provide the total number of votes as well as a breakdown of votes by option.
Note:
Users can vote on each poll once per device every 10 minutes.
You have the option to clear votes at any time. It will also clear all analytics and vote totals to 0.

Styles
Now it's time to ensure the poll stays on-brand. Within this section you can upload fonts and utilize them for your poll question ["prompt"] text, option text, and more. Here is where you will also be able to change out the background and input any sponsor logos that are not baked into the design.

Poll Prompt, Options, Status and Post-Vote Pop-Up
Poll Winner Colors
This can be toggled on or off. By default, this is toggled on. When the poll closes the winning option will appear with the styles selected.
Background and Logo
"Enable background" is on by default. However, if you'd like the background of the poll to match where this poll will be embedded, then you can toggle this off. The background will then be transparent and take the form of the background where this poll is embedded.
To upload a background, select 'Type' and a dropdown will appear. An image or video can be utilized as a background for this poll.

If a sponsor logo is not baked into the background already, then you can also insert a logo in the 'Logo' section below 'Background'. After uploading a logo you can adjust the sizing and placement.

Snippets (optional)
If you need a visualization that is more custom than the options allow for in the Smart Panel Builder, the Tagboard team is happy to help! Reach out to your dedicated Client Success Manager to get started.
If you've already worked with our team to build custom visualizations, the Snippets tab on the left sidebar of the builder is where you can apply those customizations to your Smart Panel.
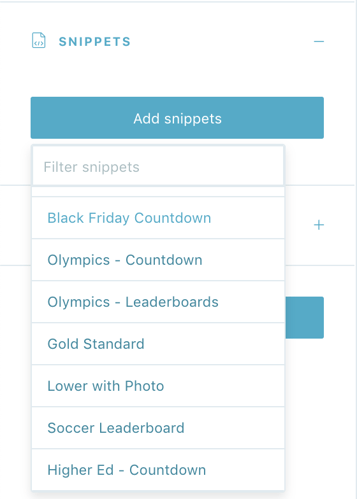
Click on 'add snippets' to view the dropdown menu that has been customized just for you. You'll see a list of every custom design the Tagboard team has already built out for you. Select the custom look you want to apply to your Interactive Poll Smart Panel.

When you add a Snippet, you are applying custom code to that visualization. Snippets can be used to customize every type of Smart Panel. If you are adding a Snippet to an Interactive Poll Smart Panel, be sure to add a Snippet that was built for that specific type of Panel in order for the CSS to apply properly.
Note:
You also have the ability to remove a Snippet, which will remove custom code from that visualization.
Tags
Once you have customized your Custom Poll in the builder, add appropriate tags in order to make your poll easier to search and access down the road. You can search for tags from the Polls dashboard.
Save
Do not forget to save your design. Click 'Save' in the upper right corner.
.png?width=300&height=50&name=kb-logo-alt%20(1).png)