Tagboard Producer functions as a cloud-based control room to build out your playlist and edit your displays on the fly. Control every piece of content in real time. Use the table of contents below to quickly navigate to a section.
- Step 1: Access Producer
- Step 2: Get Familiar with Producer
- Step 3: Build a Playlist
- Step 4: Connect a Screen
- Step 5: Produce Your Show & Go Live
Access Producer
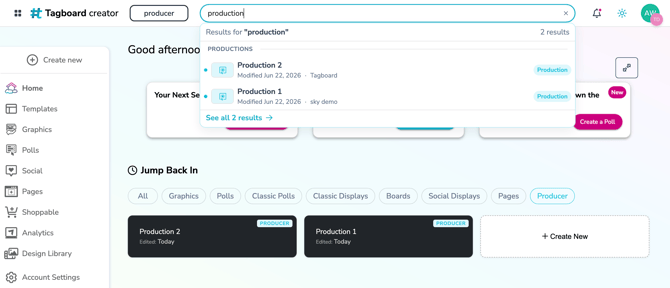
You can access Producer from any Workspace within your Tagboard account. Select "Producer" from the banner. You can also find productions through the search bar at the top or within the "Jump Back In" section of Creator.
Get Familiar with the Producer Workspace
The Producer Workspace is where you will create a new production, find all productions, and navigate between teams [if on multiple teams]. You can also see which productions are live [via a green indicator light] , any team members in specific productions, enter productions to produce shows, and more. This section will help you become more familiar with the Producer Workspace.
Producer Workspace - Dashboard
When opening the Producer Workspace, below is a visual of what the landing page could look like [depending on your grid/list view layout]. This section is the dashboard. Here you can create a new production, delete a production, and more.
Create a New Production
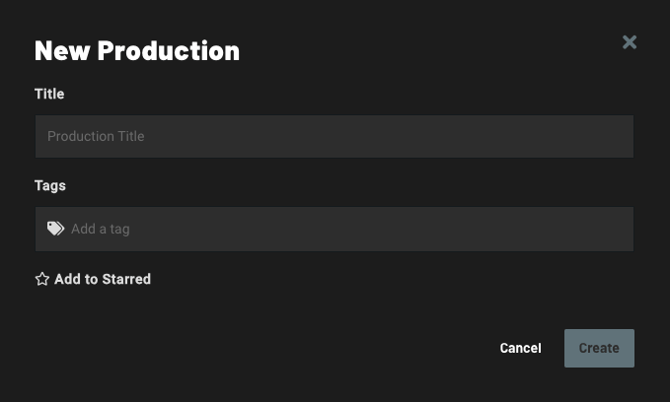
Click "+ New Production" in the upper right corner. 
Note
If you are on multiple teams, ensure you've selected the
correct team before creating a new production.
Title the production [must be between 4 and 60 characters]. You also have the options to
-
- star your production [which will have it appear at the top of the list of productions]
- add tags [easier to search when more productions are created]
Star a Production
If a production was not starred when created, you can star a production on the far right side of the row/grid. This will pin a production to the top of your Producer Workspace to allow for quick access to frequently used productions.
Production Details
A single click on any production will open a details panel on the right side of your screen. Here you can see production details including
-
- who is working in a production in real time [to allow for easy remote collaboration]
- any outputs connected to the production
- whether an output is live or not [a green light indicates it is in use on a connected screen]
Open the production towards the bottom right by clicking "Enter Production".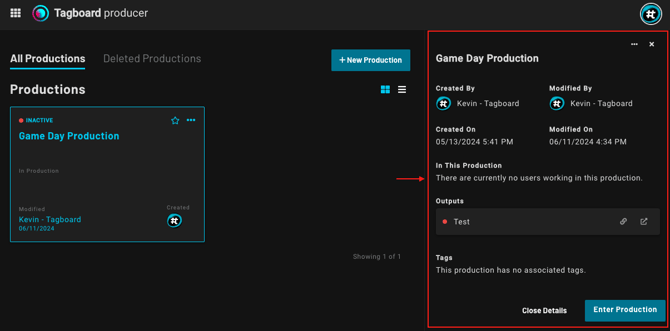
Delete a Production
To delete a production, single click the production to open the production details panel [visual above]. Click the three dots in the upper right corner, and select "Delete".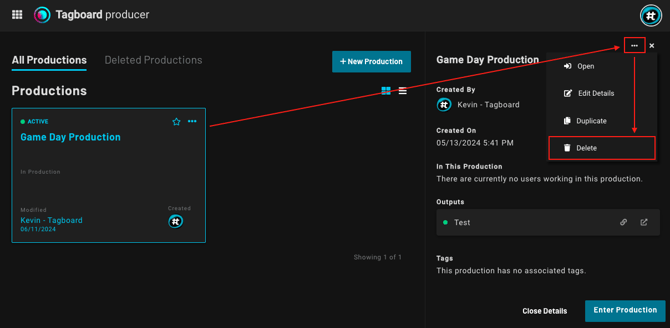
Note
Deleted Productions will be archived for 30 days before they are permanently deleted.
Rename a Production
Within the production details, clicking the 3 horizontal dots on the far right will open a menu. The menu will have an "Edit Details" option where you can change the name previously added for the production.
Restore a Production
To restore a deleted production during the 30 day timeframe, click on "Deleted Productions". Single click the production you wish to restore. Click "Restore Production" in the details panel.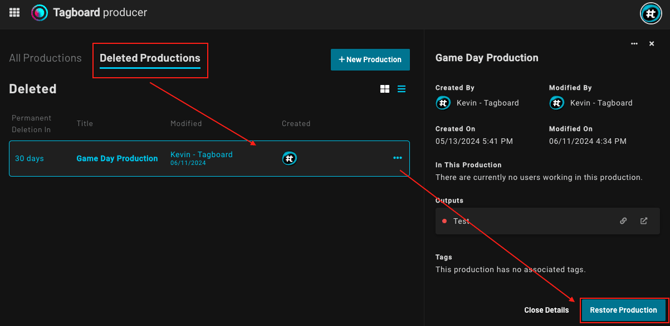
Your cloud-based control room
Now that you're familiar with the Producer Workspace dashboard, open a production [double click or open the production details]. Let's get familiar with the production suite.

-
- Asset Library & Design Library: The Asset Library is where you will find all of the content you created [Graphics, Polls, Social Displays] under Display Elements and all of the content you curated under Curated Content [Boards, Shoppable] . You can refresh this menu in the upper right corner to reflect your most recent changes and additions. The Design Library includes any photo or video files you've uploaded to Tagboard.
- Note: You can click on the pin icon [top right] to unpin/pin the Asset & Design Libraries.
- Preview Window: The Preview Window displays content in a 16:9 format so you can make sure your content looks exactly how you want it before you send it live.
- Live Window: The Live Window displays how your content will appear on your output in a default 16:9 window .
- Note: Preview and Live Windows are a default 16:9 window. If your dimensions are different, you can adjust them towards the top left of your production. Testing on your output before going live is still highly recommended.
- Playlist: Within this section, you will build out a rundown by dragging content from your Asset Library and dropping it into your Playlist. You can stack content in a specific order, then manually run each piece live or press live followed by play for content to automatically advance on its own.
- Note: Reference "Using Set It and Forget It" for the automatic cycling of content.
- Graphic Editor: The Graphic Editor allows you to edit your content in real time. Click on any element in your playlist to reveal editing options in the Graphic Editor.
- Asset Library & Design Library: The Asset Library is where you will find all of the content you created [Graphics, Polls, Social Displays] under Display Elements and all of the content you curated under Curated Content [Boards, Shoppable] . You can refresh this menu in the upper right corner to reflect your most recent changes and additions. The Design Library includes any photo or video files you've uploaded to Tagboard.
Once you have content loaded onto your Playlist, you'll see additional controls at the top of the Producer window and at the bottom of the Playlist.
Top Controls:
-
- Screen Size Preview: To preview your Tagboard displays in different screen sizes, you can choose from different presets or add a custom size by pixel. This will apply to both your Preview and Live windows. It's important to note, however, that this does not affect your actual output. The content will display as it was built.

- Background Picker: By default the background will be transparent. You can change this to any chroma color, an image or video background.

- Background Picker: By default the background will be transparent. You can change this to any chroma color, an image or video background.
-

- Audio Controls: Mute and unmute your entire timeline.
- Loop Timeline: If selected while the playlist is in 'Play' mode, the playlist will automatically restart from the beginning after the final piece of content.
- Go Back: Go back to the previous post, without auto-playing social videos
- Play: Automatically advance through the content in your timeline without clicking through posts. Each piece of content has a time you can set prior to clicking play. Videos will play out entirely before advancing to the next post.
- Note: You can control the cycle speed for images within the Layer Editor after selecting the specific content in the Playlist.
- Go Forward: Advance to the next post, without auto-playing social videos
- Clear Playlist: Click to clear all elements on your Playlist.
- Note: this will clear all content that has been updated on your timeline.
Build A Playlist
When you're ready to produce using Tagboard, you'll start by building your Playlist. Producer uses a simple drag and drop workflow to bring elements from your Asset or Design Library to your playlist.
If you don't see any content within these categories yet, then head back to your Creator Workspace to get started!
Manage content in your Playlist
Add Graphics, Polls, Social Displays, and Image and Video Files
There are three ways to load these types of content into your Playlist from the Asset Library or Design Library:
- Drag and drop individual items onto your playlist
- In the Asset Library tab, click the "+" icon to the right of each individual item
- In the Asset Library tab, check the box to the left of an item or items and then click "Add to Playlist" or "Add Group". In the Design Library tab, select an item or items and then click "Add to Playlist." Everything will be added in bulk to the bottom of the playlist in the order it was selected.
Remove Content from your Playlist
Removing content can be completed in one of two ways:
(1) The first method will be clicking the "Clear" button on the far right bottom of the Playlist controls [as seen in G above]. This will clear all the contents of the playlist. Any unsaved content edited within the Playlist will be lost.
(2) The second method will be using the three dots on the far right of the row of an individual piece of content. You will be able to choose "Remove" from this menu.
Add Curated Content
In order to load Social and Shoppable content onto your displays, you'll first need to add a Social Display, Graphic with a Social Element, or Graphic with a Shoppable Element to your Playlist. For any social displays and graphics, you'll be able to drag and drop an entire board or individual posts (by clicking into the board) into that display. For shoppable content, you can drag and drop individual pieces of merchandise onto your Graphic with a Shoppable Element.
Reordering your Playlist
To reorder elements in your Playlist, click and hold the dots on the left side of an individual piece of content. Now you can drag and drop to reorder.
Connect a Screen
See "Manage Live Display Output(s)" for a deeper walkthrough.
In short, after you've become more familiar with Producer and have a Playlist built out, you can create an output. Select the "Output(s)" button in the top right corner. Here you will be able to generate an output via URL or code, which will allow you to use Producer as a cloud-based control room to bring content live..png?width=670&height=165&name=Manage%20Output(s).png)
Produce Your Show & Go Live
Now that you're familiar with Tagboard and have built out your playlist as well as connected Producer [our cloud-based production software] to your screen, you are ready to produce your show! The benefit of using Tagboard is that you are able to edit and adjust content on the fly. Notice a misspelling in the Preview or Live Window? Correct it and immediately see the change.
Preview Content
With content in your playlist, we recommend previewing the content that's next up. 
- Click the "P" icon to the right of your content in the Playlist to send it to the Preview Window.
- Proofread what's displayed.
- If there are corrections to be made, then select the rectangle the content shows within in the Playlist. An Editor appears to the right of the Playlist for you to make changes.
- Note: The Editor displays different options forThemes, Panels, and Graphics. Each has their own unique use cases.
- Update the displayed content in the bottom right corner by selecting "Update Preview".
Send Content to Live Display
Send content live, manually, with the "L" icon. This will send it to the Live Window [1920x1080 display window] in Producer and to your live output display.
Need to edit content that is live? 
- Select the rectangle the content shows within in the Playlist. An Editor appears to the right of the Playlist for you to make changes.
- After changes are made, select "Update Live" in the bottom right corner.
Snapshot
Tagboard also offers the ability to download an image file (.png) of any display in your live window for use beyond your live production. Just take your display live and then click the "Snapshot" button above the live window to initiate that image download. More information and use cases for Snapshot are outlined here.

Note
Read "Using Set It and Forget It" if you're looking to display content in an automated way.